Bookings
This is the command center for your day. On the left you'll see every reservation for the date you pick; on the right, a live floor plan of your venue shows which tables are free, reserved, or in use right now. Update statuses, assign tables, and welcome walk-ins without leaving the page.
Business owners, managers, and staff. Anyone who works the floor or manages the booking book will live on this page during service.
Getting there
From your dashboard, click Bookings in the left sidebar.
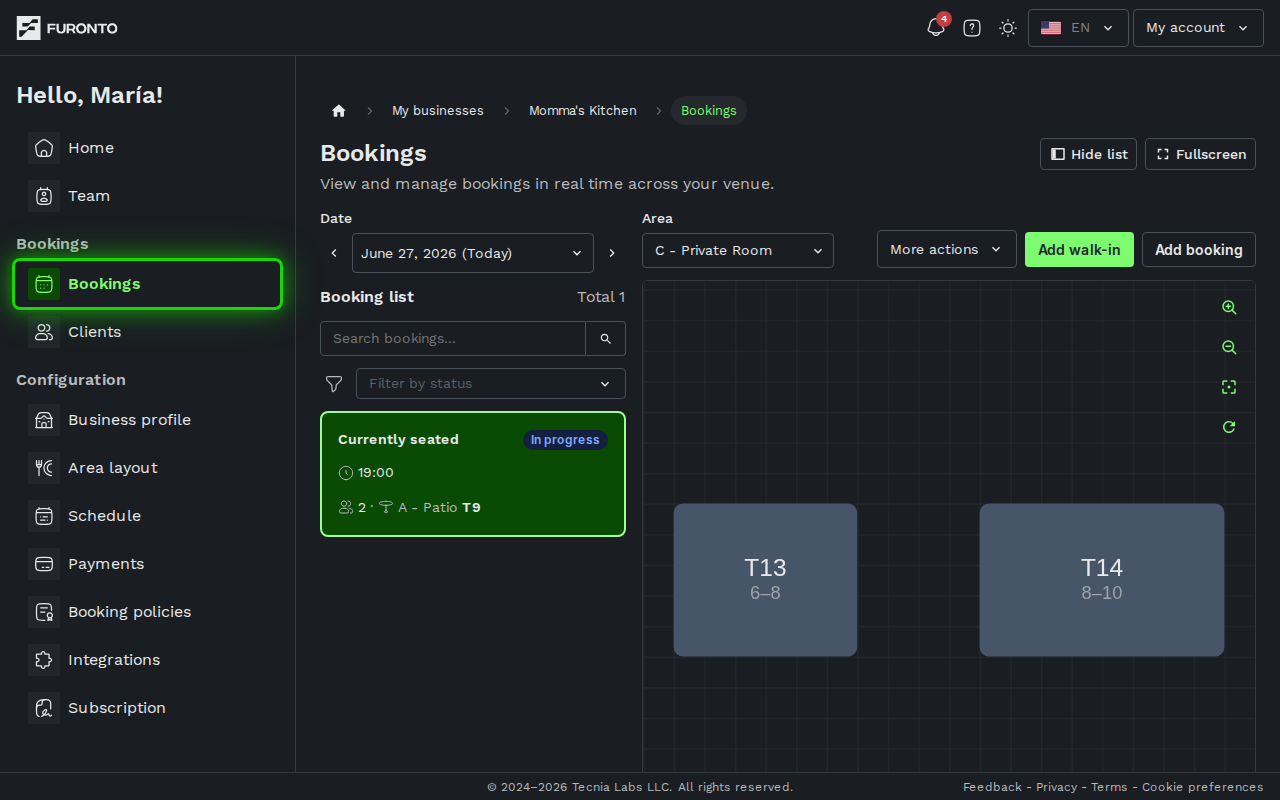
You need to be signed in and have access to the business.
Prerequisites
Before the page is truly useful, make sure you've set up the building blocks your bookings depend on.
You need at least one area with tables drawn on the floor plan, and a schedule that tells the system when you're open. Without these, the canvas on the right will show "Venue closed" or "No areas available." Set them up on the Area layout and Schedule pages first.
How it works
The page has two panels that work together. The left panel is a searchable list of bookings for the selected date. The right panel is an interactive floor plan showing the same bookings mapped onto real tables. Anything you change on one side is reflected on the other.
Step 1: Pick the date you want to see
At the top of the left panel, choose a date from the calendar picker. The booking list and the floor plan both refresh to show that day. Click Today at any time to jump back to the current day.
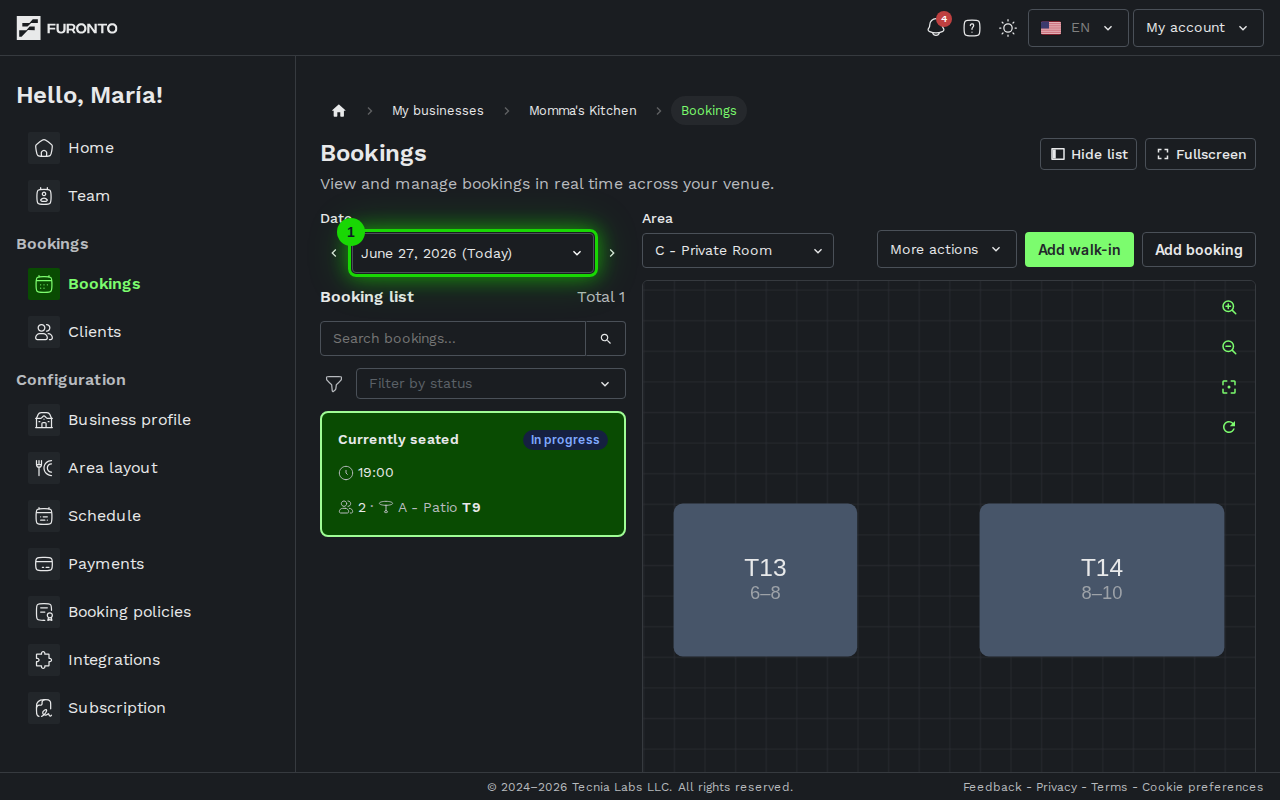
The date picker lets you browse past dates too — useful for checking who came in last week or reviewing the no-show rate for a specific night.
Step 2: Choose which area to view
When your venue has more than one area (main dining room, patio, private room, and so on), use the Area dropdown above the floor plan to switch between them. The booking list and the canvas both filter to that area.
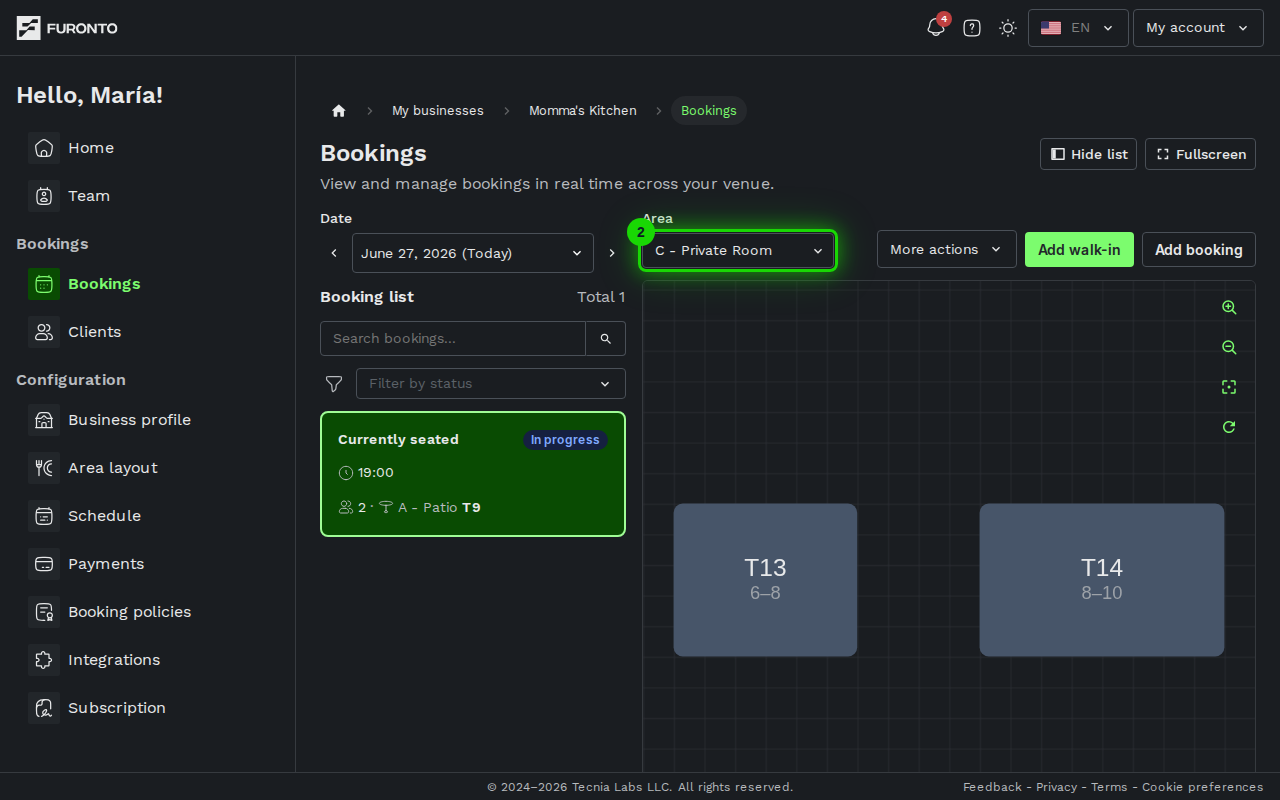
If the area selector shows "Venue closed" or "No areas available," it means either your venue isn't open on the selected date, or no areas have been configured. This is the system protecting you from taking bookings when you shouldn't.
Step 3: Find a booking in the list
Use the search bar above the booking list to find a specific customer. It matches names, and the count below shows how many bookings match. Each card shows the guest's name, their table, party size, time, and current status.
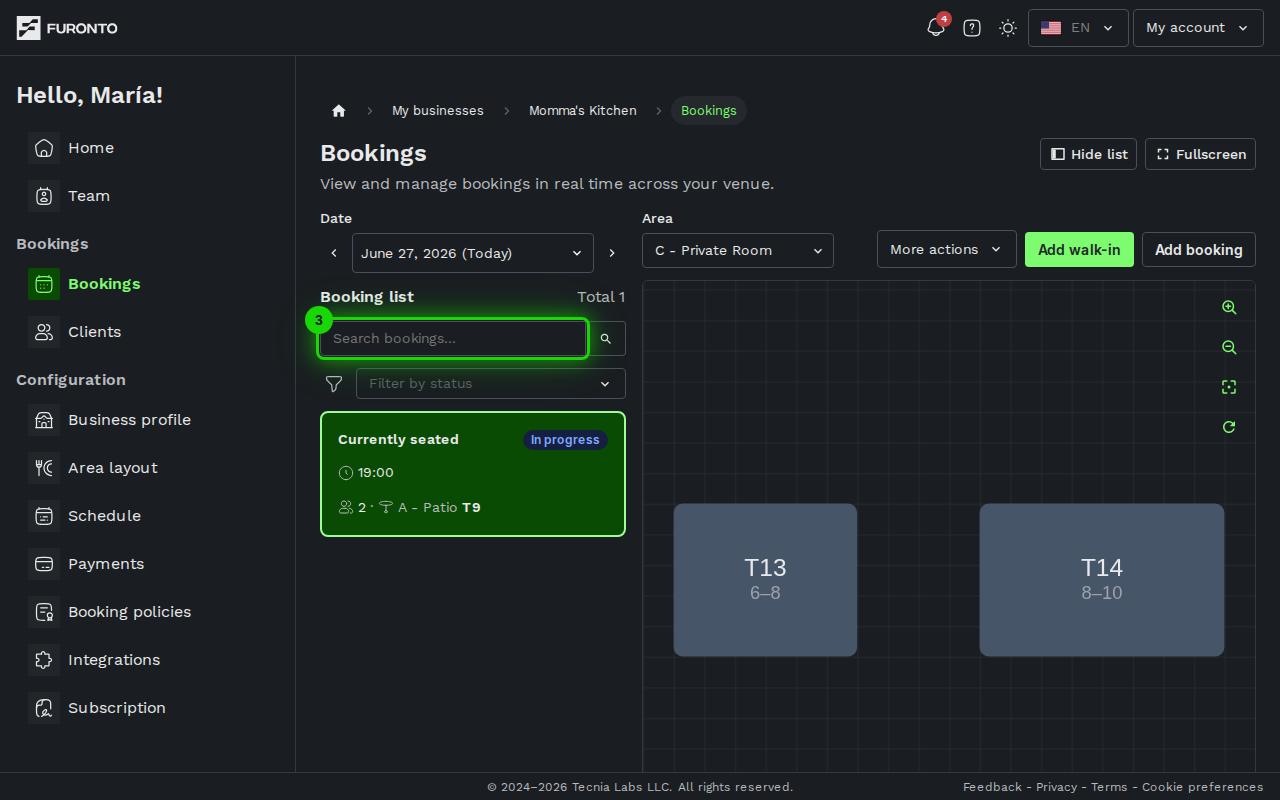
If a booking has notes (special requests, allergies, a birthday), a small document icon appears on the card. Open the booking to read the full note.
Step 4: Filter by status
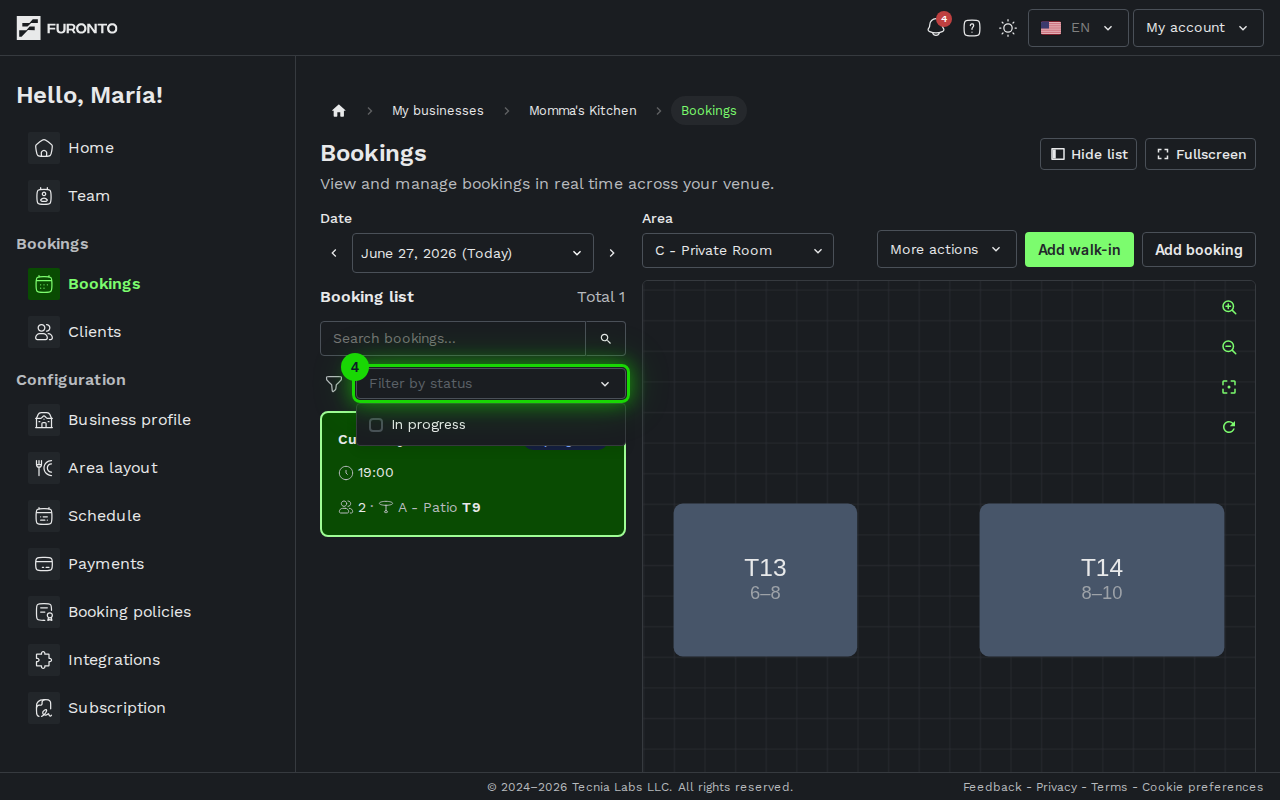
Click the Filter button below the search bar to narrow the list by booking status — pending, confirmed, in progress, completed, cancelled, or no show. This is the fastest way to find, say, every pending booking that still needs your confirmation.
Step 5: Open a booking to manage it
Click the More button on any booking card to open the booking detail panel. From there you can assign or change tables, mark the party as arrived (which seats them), update the status — complete, no-show, or cancel — edit notes, and review customer contact info.
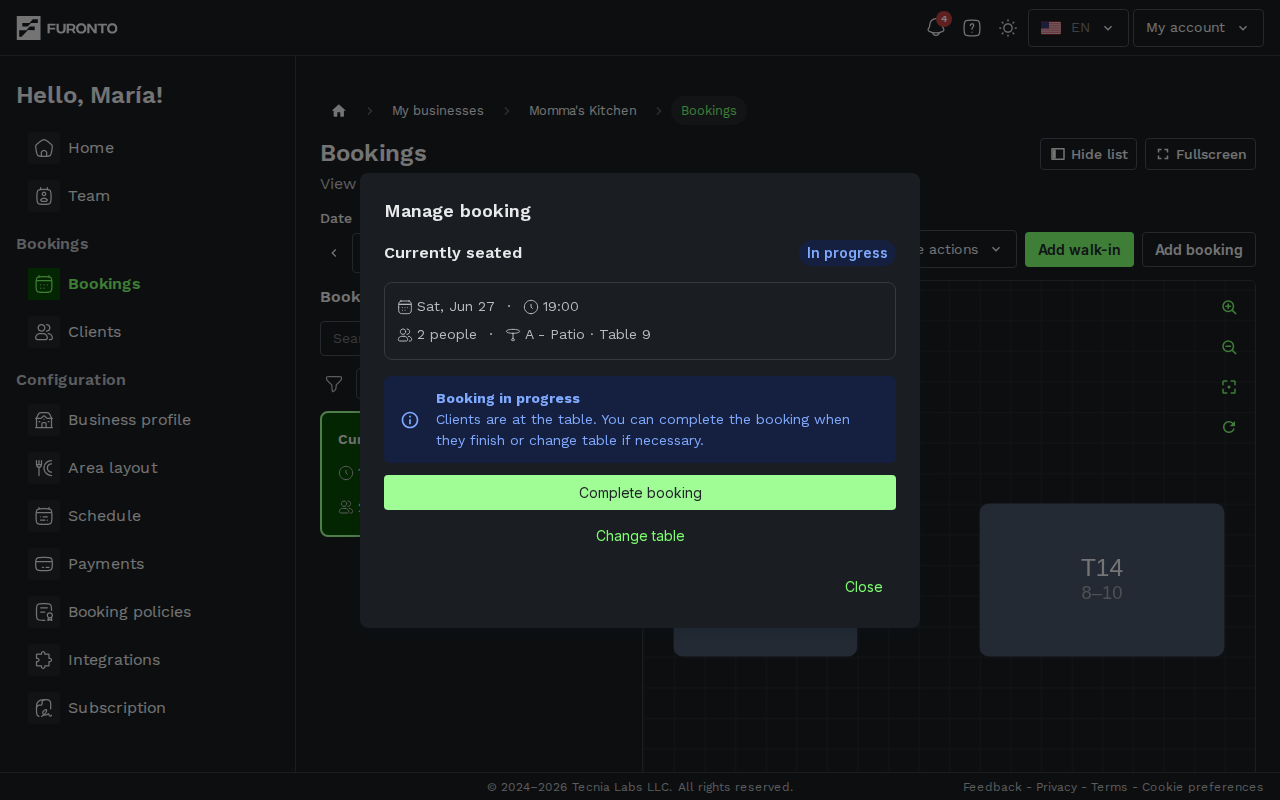
Assigning a table just reserves it for the booking — it doesn't mark anyone as seated. Use Mark as arrived when the party actually sits down. That means you can pin tables to upcoming reservations ahead of time without them showing as "in service" on the floor.
You'll see Cancel before the booking's start time and Mark as no-show once it's due: a booking that has already started can't be cancelled — only completed or marked as a no-show.
If your team works from more than one device, you don't need to refresh. Seating a party, assigning or freeing a table, adding a walk-in, cancelling a booking, or rearranging the floor plan shows up on every other device viewing that same day within a second or two.
Devices only react to the day they're showing, so someone reviewing tomorrow's bookings won't be interrupted by today's activity. If a device loses connection, it catches up automatically as soon as it reconnects — or when you switch back to that browser tab.
When you open a booking and choose Change table, you can also switch the area — useful when a party is better placed on the terrace, or when you're rearranging the room. Pick the new area, then pick a table there, and save.
The booking's capacity moves with it, so your availability stays correct on both sides. If the area you picked is already fully booked for that table size at that time, the move is refused rather than squeezing in a party the room can't seat — pick another area or another time.
Only areas that are open on the selected date are offered.
When you pick a table, the list only offers tables that are actually free for that booking's time. Two things are filtered out: tables already promised to another booking whose service overlaps, and tables where a party is currently seated — even if that party has run past its scheduled slot.
The same rule applies at seating time. If a table you assigned earlier is still occupied when the party arrives, Mark as arrived is unavailable and a notice names the table and who's sitting there. Either complete that booking (the guests have left) or move the arriving party to another table, then mark them as arrived.
A table booked for a different service — lunch when you're seating dinner — stays available. Only overlapping bookings and parties actually sitting down block it.
Cancelling a booking releases the table and notifies the customer by email — including someone you booked in yourself who has no account, as long as you recorded an address for them. If the customer paid a guarantee hold, the hold is released automatically. You can't undo a cancellation — you'd need to create a new booking.
Step 6: Create a new booking
Click the Add booking button above the floor plan. This is the form to use when someone calls, writes, or asks at the desk and you're taking the booking on their behalf.
Start with the customer:
- Already a customer (on by default) — search your customer list by name, email, or phone and pick them. The booking is attached to their account, so it shows up in their own bookings.
- Turn it off for someone who has never booked with you, and type their first name (required) and last name, plus a contact email if they gave you one.
Then choose the service type — or flip the Event switch to book against a specific event, which are listed with their dates. Picking an event sets the date for you. For a regular service you pick the date yourself, then the party size, area, time, and any notes.
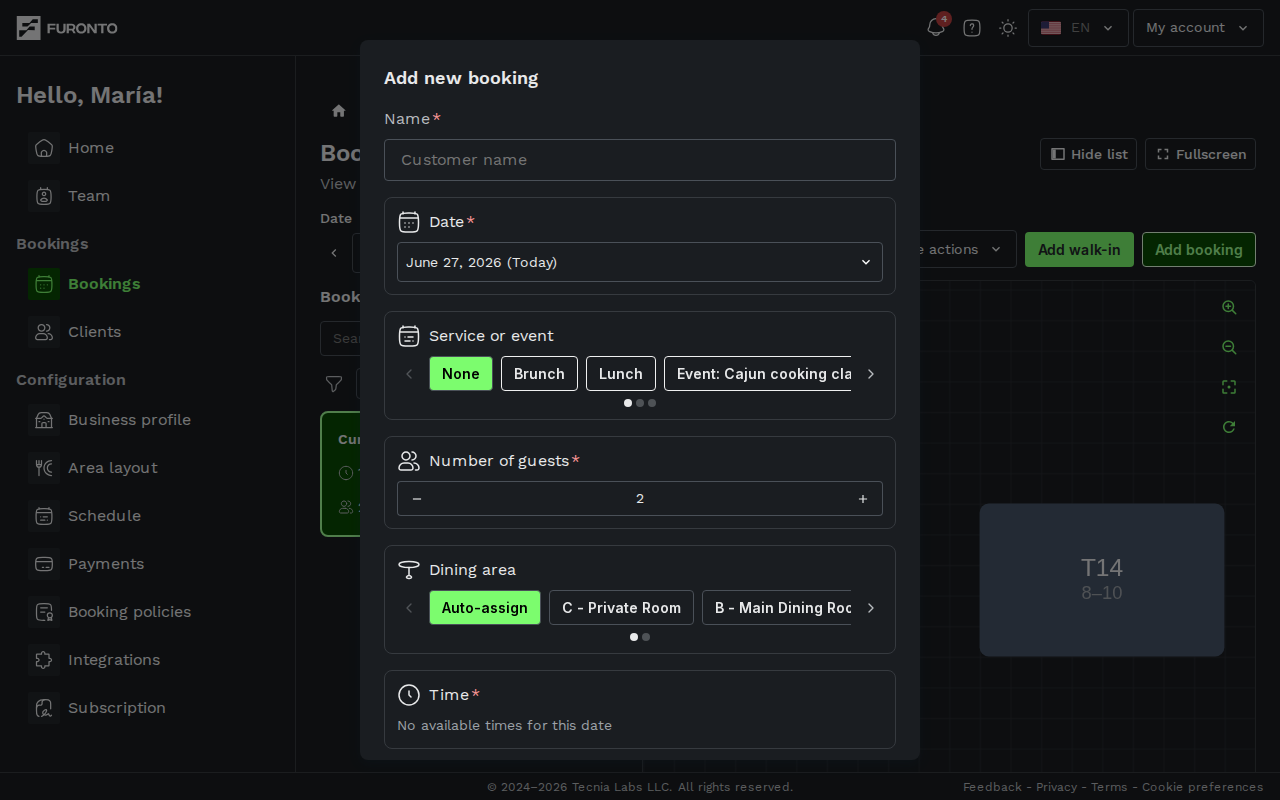
When the customer has an email on file, a Send confirmation e-mail switch appears. Leave it on and they get the same confirmation and calendar invite as a customer who booked online. Turn it off to record the booking quietly.
Recording an address for a non-customer is worth the extra few seconds: it's the only way to reach them if anything changes. They'll get the confirmation, plus a cancellation email if you cancel the booking (whether one at a time or through a schedule closure) and a modification email if you move it to a new time.
Two differences from a customer with an account. Their emails carry no "manage your booking" button — that page needs an account to open — so every change still goes through you. And they arrive in English, since there's no account holding a language preference.
The confirmation offers a Sign up to see your booking button instead. If they create an account with that same address, the booking (and any other you've taken under that address) shows up in their own bookings, and from then on it works like any customer's.
Leave the email blank and the booking still works; they simply can't be notified about anything.
Staff can search the customer list and pick a customer by name, but contact details are hidden from them — only owners see full email and phone numbers, and managers see them partially masked. Staff can still send the confirmation email; the address just isn't shown on screen.
Step 7: Seat a walk-in
When someone arrives without a booking, click the Add walk-in button above the floor plan. Pick the table (or combine a few for a larger party), enter the customer's first and last name and the party size, and confirm. The table is marked as occupied immediately.
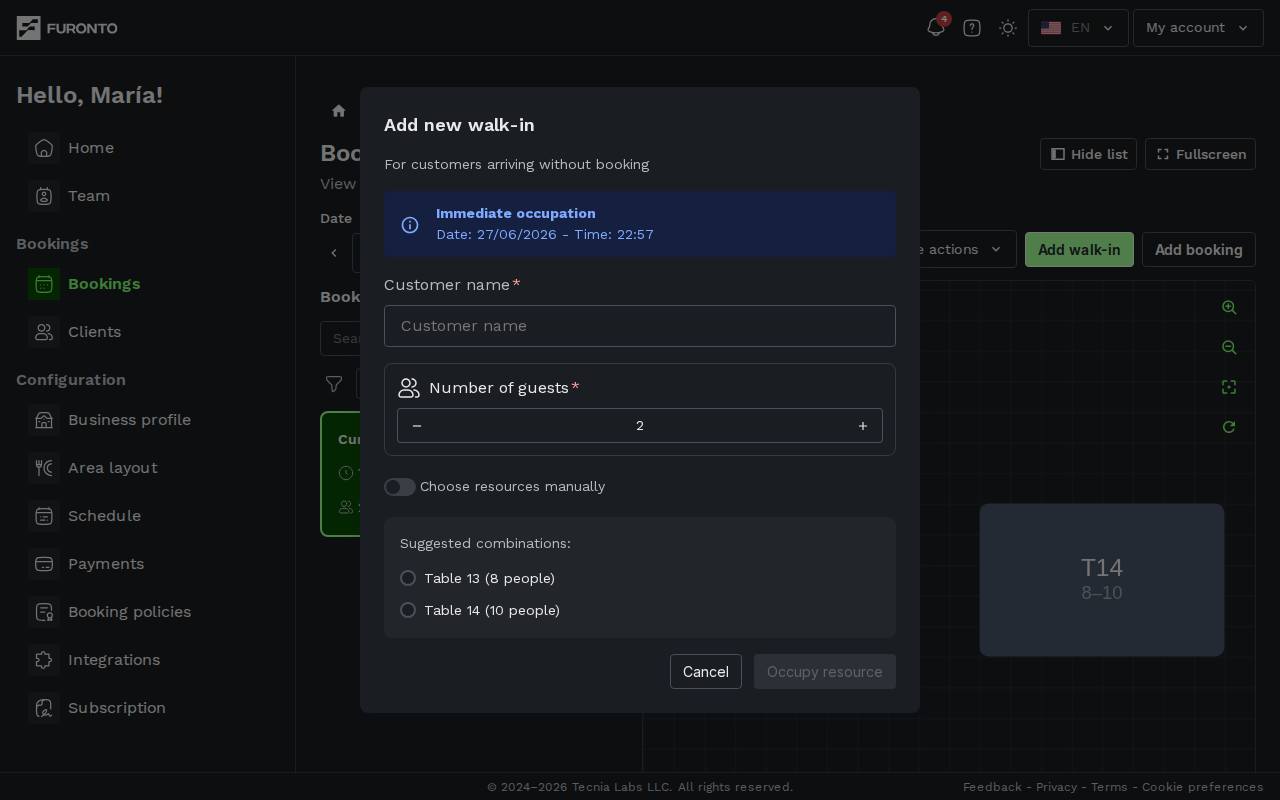
Adding a walk-in is a fast, in-the-moment action for people who just walked in. It doesn't go into the booking flow with confirmations, emails, or guarantee holds — it's only meant to block the table for the current service.
Step 8: Work with the floor plan
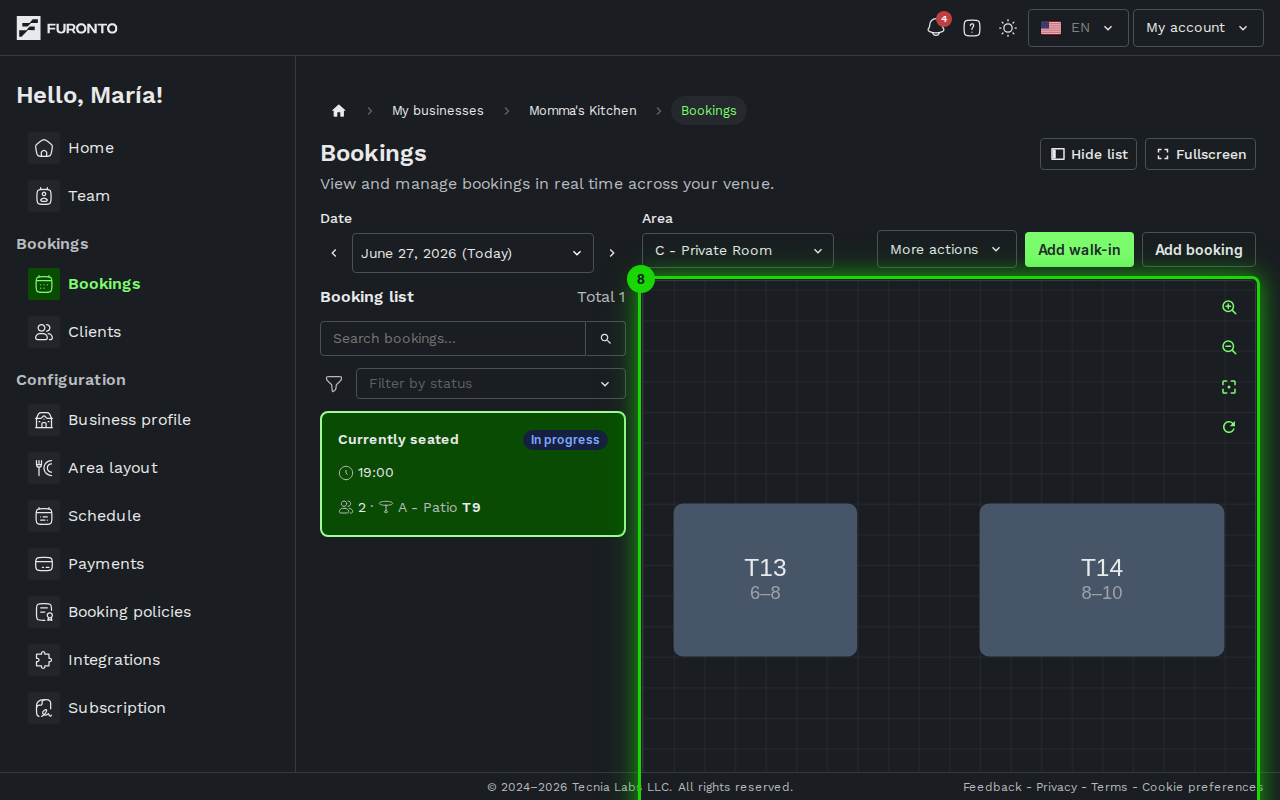
The canvas on the right shows every table in the selected area, color-coded by status:
- Green — available
- Blue — reserved for a future booking
- Orange — occupied right now
- Grey — locked or not in service
Click a table with an active booking to jump straight to its detail panel. Use the zoom and pan controls in the corner to navigate a large floor plan.
Step 9: Use the canvas modes
In the bottom-right corner of the canvas, three buttons toggle special modes:
- Edit mode lets you drag tables to rearrange them for the selected date — for example, when you've pushed two tables together for the night. Your changes save automatically and are shared with your whole team, so everyone sees the same floor for that date.
- Combine tables lets you merge two or more tables into a single seating for a large party. Click the tables you want to combine.
- Lock view freezes the canvas so nothing can be moved accidentally during a busy service.
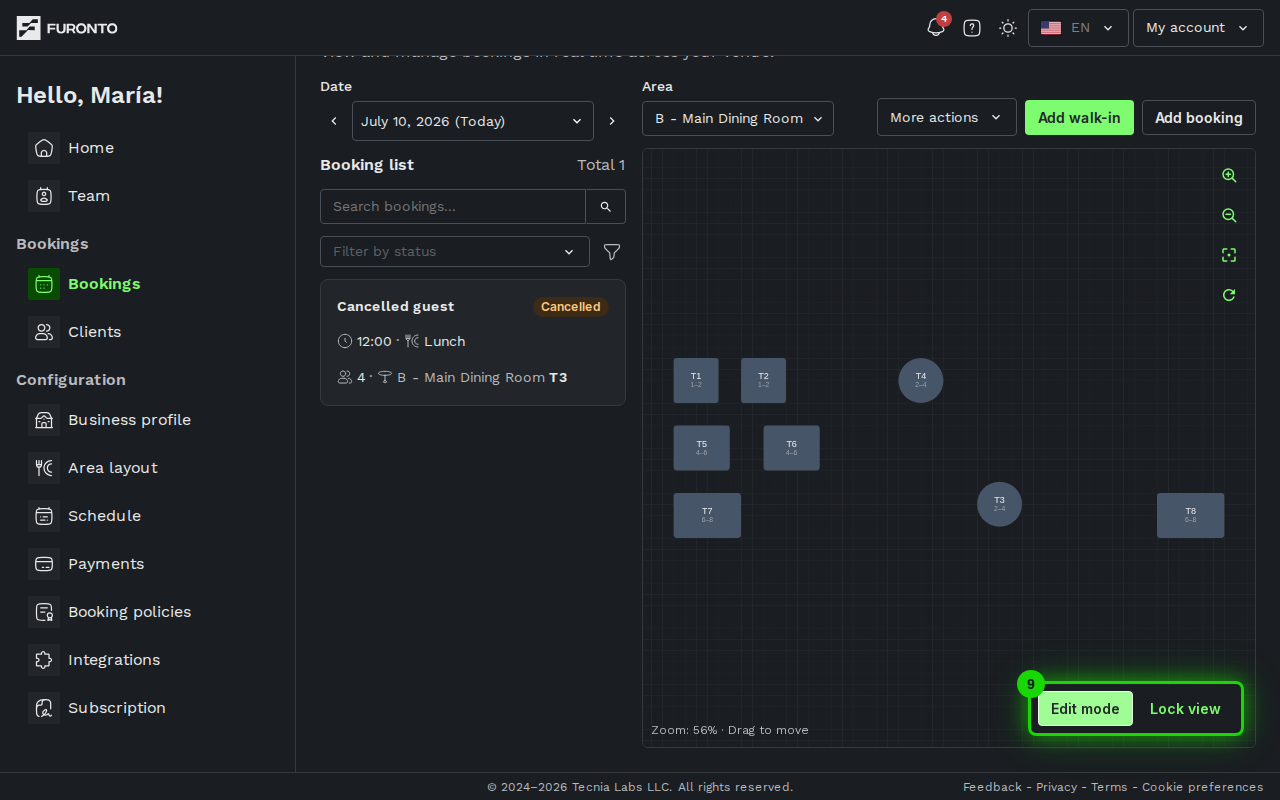
Each date keeps its own arrangement, and a new date always starts from your default layout. These changes never touch your permanent floor plan — edit that on the Area layout page. You can only rearrange today and future dates; past dates are shown read-only, as a record of how the floor was set that day. When a date has a custom arrangement, a Reset layout button appears next to Edit mode to restore that date to your default. The bottom-left corner (next to the zoom level) shows the current state — Custom layout, Read-only, or Saving….
Enter fullscreen mode (the expand button in the top-right of the page) when running a service. It gives the canvas the whole screen and makes it easy to tap tables on a tablet from the host stand.
Step 10: Export the booking list
Open the more actions menu above the floor plan and choose Export to download your bookings as a spreadsheet — for a monthly report, an accountant, a printed service sheet, or just an archive.
You choose four things:
- When. A single day (today's date is prefilled) or a date range of up to 62 days.
- Format. CSV for maximum compatibility, Excel (.xlsx) for a proper spreadsheet with a bold header row, or Excel legacy (.xls) for very old versions of Excel.
- Which bookings. Narrow by status and by service. Leaving a filter empty means everything — that's the default, not "nothing".
- Which columns. Sixteen are available, from booking ID and party size through to payment status, add-ons, and contact details. Leave the picker empty for all of them.
The file is named after your venue and the dates, so downloads stay sorted — bookings-mommas-kitchen-2027-03-04.xlsx.
In a CSV, Excel treats a phone number that starts with + as a calculation and shows it as a plain number with the + and any leading zeros stripped. The .xlsx export keeps contact details exactly as entered, so pick that format whenever the contact column matters.
A column that's blank for every booking in your export is dropped from the file, even if you picked it — so a venue that doesn't take payments won't get four empty payment columns. Filter down to zero bookings and you still get the header row, so you can see the shape of the file.
Tips and best practices
- Start every shift by filtering to Pending — Confirm bookings before the rush so you're not juggling confirmations during service.
- Use fullscreen on a tablet at the host stand — The floor plan is designed for a quick glance to see what's free and what's in use.
- Combine tables ahead of a large party — Do this before the guests arrive so the system knows the available capacity (it accounts for the seats lost where tables touch). You can split them back afterwards.
- Mark completed bookings as they finish — This releases the table on the floor plan so the next booking or walk-in can be seated.
- Check notes before seating — Birthdays, allergies, and accessibility requests are in the booking notes. A quick look saves an awkward conversation.
Troubleshooting
The canvas says "Venue closed"
Solution: This means your schedule has no hours configured for the selected date. Go to the Schedule page and add either a regular weekday schedule or a special date schedule for that day.
I can't see any areas in the dropdown
Solution: You haven't set up any areas yet, or the areas you created are inactive for the selected date. Visit the Area layout page to draw your floor plan and add tables.
A booking isn't appearing in the list
Solution: Check the selected date at the top of the list — bookings are filtered to the date you've picked. Also check whether you have any status filters active; if so, clear them with the filter button.
I marked a table as occupied but the guest never arrived
Solution: Open the occupied booking from the list and mark it as cancelled. The table will be released immediately and is available to seat another guest.
The table I want isn't in the list when I try to assign it
Solution: The table is taken for that booking's time — either another booking overlaps it, or a party is still seated there. Check the floor plan: orange means occupied right now, blue means reserved for a later booking. If the guests at an orange table have actually left, open their booking and mark it complete to release the table.
"Mark as arrived" is greyed out
Solution: One of the tables assigned to this booking is still occupied by another party — the notice above the button names which table and who's there. Complete that booking if the guests have left, or use Change tables to move the arriving party somewhere free.
I can't drag tables on the canvas
Solution: Two things need to be true. Edit mode must be on — click the Edit mode button in the bottom-right corner of the canvas. And the selected date must be today or in the future: past dates are read-only, so the Edit mode button is disabled on them. Your changes save automatically for that date and are shared with your team. To change your permanent layout instead, use the Area layout page.
Related pages
- Area layout — Draw and edit the floor plan this page uses
- Schedule — Set the hours when bookings can be taken
- Customers — Browse the people behind your bookings
- Home — Dashboard overview with today's booking summary